Highlight Author Comments in Blogger websites with CSS

Change Author Comments Color Style
Hi friends, you surely have seen on many blogs and websites whenever an Admin of the blog or website make a reply to your comments, its comment's color and style is changed from other comments. These admin styled Comments are the best way to make good relationship with blog visitors or Followers.
So do you have a blog and your blog is getting good traffic then your blog will also be getting many comments, that may be positive or negative related to your blog website content.


 If you want to highlight your comments in your blog website, then here is the trick to do that and make your comments stylish,colorful and recognizable to others.Here I am going to share the trick to highlight Author Comments in Threaded comments and this trick also work in basic commenting system. This is coded using simple CSS and Jquery.

How To change Author Comments style In Blogger

Learn how to change blogger admin comments style and color in blogger template using CSS and Jquery for better interaction with your blog's users in easy steps.

Step 1.  Login to Blogger >> Go to Dashboard >> Template >> Edit Html

Step 2.  Find </body> and copy the following code above it [Tip: Ctrl+F]
<script type="text/javascript">
    $(function() {
      function highlight(){
        $(&#39;.user.blog-author,.ssyby&#39;).closest(&#39;.comment-block&#39;)
          .css(&#39;border&#39;, &#39;1px solid #e1e1e1&#39;)
          .css(&#39;background&#39;,&#39;#f1f1f1 url(&quot;https://blogger.googleusercontent.com/img/b/R29vZ2xl/AVvXsEicWqY359PMJSTrFZrCT9wuW0fLJA_MQ-ghyphenhyphenYt19TrvBqExN0lde3-KC3_JOZjsVNXSNaWE9D2PGb1KSlEoXtkeFT7A0BfHMQwefg0F7AMtTNCz_8pA97UoTVnxUD9qm9_zJ4zIWv0A1Xk/s1600/admin_comment1.png&quot;) no-repeat bottom right&#39;)
          .css(&#39;padding&#39;, &#39;10px&#39;);
          }
          $(document).bind(&#39;ready scroll click&#39;, highlight);
   });</script><a style="display:none" href="http://www.blogtipsuk.com" >Blogger seo tips</a>
Step 3.  Change red color bolded text according to your choice for border of the author comment.

Step 4.  Now save your template and you are done.

Congratulations you are done. If you enjoyed this article please like and share.

Install Scrolling "Back To Top" Button for Blogger/Blogspot

"Back To Top" Button
You surely have seen on many blogs and websites a  "Back To Top" Button in the sidebar at the bottom of the page that shows an image when clicked, it takes the user to top of your blog website. Animated back to top button in blogger website is one of the best Jquery style animated widget that looks good and also visitors enjoy easy site navigation scroll to top.

The best thing about this button is that it appears only when the user scrolls down the page and disappears as he scrolls up, and also one more feature of this script you can add your own image that you like as the back to top button.

Exactly same type of Back to Top Button in being used in our site. Probably one of the best Back to Top Button.

You would also like to use:  Sharing Buttons for websites in Blogger.

Add Smooth Scrolling "Back To Top" Button Widget to Blogger Jquery

Step 1.  Log in to your Blogger Dashboard, then go to Layout and click on Add a Gadget link
Step 2.  From the pop-up window, scroll down and choose HTML/JavaScript.
Step 3.  Select & Copy the code below and paste it into the new HTML/JavaScript:
<script src='http://ajax.googleapis.com/ajax/libs/jqueryui/1.8.23/jquery-ui.min.js' type='text/javascript'></script>
<script type="text/javascript">
var scrolltotop={
//Modified by www.blogtipsuk.com more JQuery Scroll to Top Design
//startline: Integer. Number of pixels from top of doc scrollbar is scrolled before showing control
//scrollto: Keyword (Integer, or "Scroll_to_Element_ID"). How far to scroll document up when control is clicked on (0=top).
setting: {startline:100, scrollto: 0, scrollduration:1000, fadeduration:[500, 100]},
controlHTML: '<img src="IMAGE LINK" />', //HTML for control, which is auto wrapped in DIV w/ ID="topcontrol"
controlattrs: {offsetx:5, offsety:5}, //offset of control relative to right/ bottom of window corner
anchorkeyword: '#top', //Enter href value of HTML anchors on the page that should also act as "Scroll Up" links
state: {isvisible:false, shouldvisible:false},
scrollup:function(){
if (!this.cssfixedsupport) //if control is positioned using JavaScript
this.$control.css({opacity:0}) //hide control immediately after clicking it
var dest=isNaN(this.setting.scrollto)? this.setting.scrollto : parseInt(this.setting.scrollto)
if (typeof dest=="string" && jQuery('#'+dest).length==1) //check element set by string exists
dest=jQuery('#'+dest).offset().top
else
dest=0
this.$body.animate({scrollTop: dest}, this.setting.scrollduration);
},
keepfixed:function(){
var $window=jQuery(window)
var controlx=$window.scrollLeft() + $window.width() - this.$control.width() - this.controlattrs.offsetx
var controly=$window.scrollTop() + $window.height() - this.$control.height() - this.controlattrs.offsety
this.$control.css({left:controlx+'px', top:controly+'px'})
},
togglecontrol:function(){
var scrolltop=jQuery(window).scrollTop()
if (!this.cssfixedsupport)
this.keepfixed()
this.state.shouldvisible=(scrolltop>=this.setting.startline)? true : false
if (this.state.shouldvisible && !this.state.isvisible){
this.$control.stop().animate({opacity:1}, this.setting.fadeduration[0])
this.state.isvisible=true
}
else if (this.state.shouldvisible==false && this.state.isvisible){
this.$control.stop().animate({opacity:0}, this.setting.fadeduration[1])
this.state.isvisible=false
}
},
init:function(){
jQuery(document).ready(function($){
var mainobj=scrolltotop
var iebrws=document.all
mainobj.cssfixedsupport=!iebrws || iebrws && document.compatMode=="CSS1Compat" && window.XMLHttpRequest //not IE or IE7+ browsers in standards mode
mainobj.$body=(window.opera)? (document.compatMode=="CSS1Compat"? $('html') : $('body')) : $('html,body')
 mainobj.$control=$('<div id="topcontrol">'+mainobj.controlHTML+'</div>')
.css({position:mainobj.cssfixedsupport? 'fixed' : 'absolute', bottom:mainobj.controlattrs.offsety, right:mainobj.controlattrs.offsetx, opacity:0, cursor:'pointer'})
.attr({title:'Scroll to Top'})
.click(function(){mainobj.scrollup(); return false})
.appendTo('body')
if (document.all && !window.XMLHttpRequest && mainobj.$control.text()!='') //loose check for IE6 and below, plus whether control contains any text
mainobj.$control.css({width:mainobj.$control.width()}) //IE6- seems to require an explicit width on a DIV containing text
mainobj.togglecontrol()
$('a[href="' + mainobj.anchorkeyword +'"]').click(function(){
mainobj.scrollup()
return false
})
$(window).bind('scroll resize', function(e){
mainobj.togglecontrol()
})
})
}
}
scrolltotop.init()
</script>


Step 4.  Replace IMAGE LINK with the image link of your back to top button.We have collected some back to top buttons for your ease. If you want to add image link then right click any button below and select "Copy image URL" and add this link:

Collection of Back to Top buttons

back to topback to topback to topback to topback to topback to topback to top

Step 5.  Save the Widget and drag it near the footer or any bottom position.
Step 6.  View your blogger website to see Smooth Scrolling "Back To Top" Button.

Related Posts reduces bounce rate

Want some other widgets for blog designs or need any help regarding this post, then you can comment below. I will try to answer as soon as possible. Enjoy your day!

Add Floating Sliding Facebook LikeBox Widget in Blogger

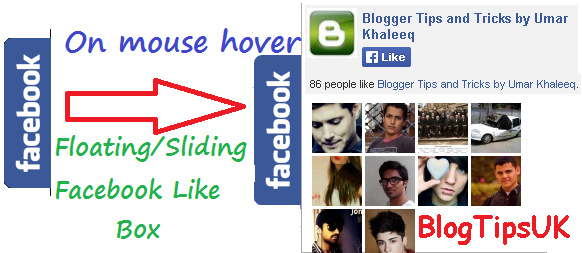
Facebook LikeBox Widget
Blogging has become a trend now a days online. Every blogger want there blog attractive and stylish so they always add new and more beautiful widgets in there blogs.Today I am going to share a very easy and simple way to put a sliding Facebook like box which is called Sliding Facebook Like Box or Floating Facebook Like Box.The widget works as a fb image remains in a fixed position on the right hand side of your site.  When you hover over the blue facebook image, the like box will then slide and reveal itself using jquery.
Simple when you take your mouse on facebook image , like box will then appear.

Add Facebook Floating Like Box Widget in your blogger websites
The process of adding this widget to your blog is simplest. You need just to follow below steps:

1. Open Blogger
2. Go to Layout
3. Add a Gadget
4. Add HTML/JavaScript
5. Copy the below code and Save
<!--Floating Facebook Widget by http://bloggerseotipstraining.blogspot.com/ START-->
<script type="text/javascript"> /*<![CDATA[*/ jQuery(document).ready(function() {jQuery(".blogtipsuk").hover(function() {jQuery(this).stop().animate({right: "0"}, "medium");}, function() {jQuery(this).stop().animate({right: "-250"}, "medium");}, 500);}); /*]]>*/ </script> <style type="text/css"> .blogtipsuk{background: url("https://blogger.googleusercontent.com/img/b/R29vZ2xl/AVvXsEjV_GLSCvB6szsxNBkYOIJ4msDilf6gDZ85-GhxyqvUOG7X9uvItmqerQBZnCWLmj1CIZh5WRIphC2ETs0md3spmPNL6OYndTziRDXC0_w0W7m2Zg7cduFKS-Va_61iT-z1moU51GMHmGaq/") no-repeat scroll left center transparent !important; float: right;height: 270px;padding: 0 5px 0 46px;width: 245px;z-index:  99999;position:fixed;right:-250px;top:20%;} .blogtipsuk div{ padding: 0; margin-right:-8px; border:4px solid  #3b5998; background:#fafafa;} .blogtipsuk span{bottom: 4px;font: 8px "lucida grande",tahoma,verdana,arial,sans-serif;position: absolute;right: 6px;text-align: right;z-index: 99999;} .blogtipsuk span a{color: gray;text-decoration:none;} .blogtipsuk span a:hover{text-decoration:underline;} } </style><!--Brought to you by http://bloggerseotipstraining.blogspot.com/--><div class="blogtipsuk" style="">
<!--http://bloggerseotipstraining.blogspot.com/2014/04/add-stylish-facebook-floating-like-box-widget-to-blogger.html--><div>
<!-- http://bloggerseotipstraining.blogspot.com/2014/04/add-stylish-facebook-floating-like-box-widget-to-blogger.html--> <iframe src="http://www.facebook.com/plugins/likebox.php?href=Write URL of Facebook Page&width=245&colorscheme=light&show_faces=true&border_color=white&connections=9&stream=false&header=false&height=270" scrolling="no" frameborder="0" scrolling="no" style="border: white; overflow: hidden; height: 270px; width: 245px;background:#fafafa;color:000;"><!--Brought to you by www.BlogTipsUK.com--></iframe><!--Brought to you by http://bloggerseotipstraining.blogspot.com/--><span><!--Brought to you by http://bloggerseotipstraining.blogspot.com/--><b:if cond='data:blog.url == data:blog.homepageUrl'><center>
<a style="color:#a8a8a8;font-size:8px;" href="http://www.blogtipsuk.com">New Blogger Tips</a> - <a style="color:#a8a8a8;font-size:8px;" href="http://bloggerseotipstraining.blogspot.com/2014/04/add-stylish-facebook-floating-like-box-widget-to-blogger.html">Floating Facebook LikeBox in website</a></center></b:if>
</span></div>
</div>
<!--Floating Facebook Widget by http://bloggerseotipstraining.blogspot.com/ END-->
6. Save Arrangement 

Customization

1. The floating is set to right side of your blog, if you want set it for left side of your blog then simply change the bolded float:right property to float:left
2. Change Write URL of Facebook Page with your own facebook page URL.

Note:
If the floating facebook like box widget is not working properly after step 1, then you need to add jquery to your site. 
Follow the instructions below. 
1. Go to Design>Edit HTML
2. Search for <head> and just below it paste the following JQuery code. 
<script src='https://ajax.googleapis.com/ajax/libs/jquery/1.6.1/jquery.min.js' type='text/javascript'/>