Enable Custom robots header tags for blogger SEO Traffic

enable Custom robots header tags in blogger
Blogger has recently introduced search preferences tab in Blogger and continually introducing new features in it to help fellow bloggers do better SEO of their blogs. This will help bloggers to increase your blogs traffic and get better google search results rankings.
One of the new features introduced by blogger's developers is Custom Robots Header Tags.This tool plays great role in our blog's Search Engine Optimization. Using it properly helps us to gain more visitors from search engines and hence our blog page views will also increase.
Also the search engine will not accept the duplicate content form your site so you can avoid your site duplicate content with the custom robots header tags settings.

What are Custom Robots Header Tags ?


These are all the header tags used in blogger and their usage/meaning is defined below.

all:  There are no restrictions for indexing or serving. This is default for all pages
noindex:  Do not show this page in search results and do not show a "Cached" link in search results.
nofollow:  Do not follow the links on this page
none:  Equivalent to noindex, nofollow
noarchive:  Do not show a "Cached" link in search results.
nosnippet:  Do not show a snippet in the search results for this page
noodp:  Do not use metadata from the Open Directory project (DMOZ) for titles or snippets shown for this page.
notranslate:  Do not offer translation of this page in other languages in search results.
noimageindex:  Do not index images on this page.
unavailable_after: [RFC-850 date/time]: Do not show this page in search results after the specified date/time. The date/time must be specified in the RFC 850 format. Example: 17 May 2012 15:00:00 PST

How to Enable Custom robots header tags in Blogger SEO

Follow these steps to enable Custom robots header tags in Blogger Blogs to increase your blog traffic and page views.

Step 1.  Log in to your blogger account Dashboard and click on your blog.
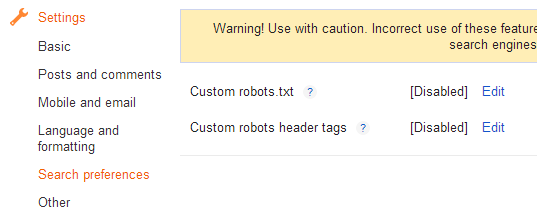
Step 2.  Go to Settings >> Search Preferences.
Step 3.  
Click on edit link in front of Custom Robots Header Tags and then click on Yes option.
Step 4. 
Once you click on the Yes you will see many options. Simply tick on the options as shown in the below image.
Best Custom robots header tags for blogger SEO Traffic

Step 5.  Now click on "Save changes" button and You are done!

That's all! If you have any doubt or need help about this post, please leave comment.

Custom Robots.txt file for Blogger/Blogspot blogs for SEO

Custom Robots.txt for blogger
Today I will show you How to Enable Custom Robot.txt File in Blogger for better SEO and search engine results?

Blogger now lets you edit your blog's robots.txt file. What are Robots.txt files, robots files are plain text files which instruct the search engines what to not index. Robot.txt is a way to tell search engines whether they are allow to index a page in the search result or not. The bots are automatic, and before they could access your site, they check the Robot.txt file to make sure whether they are allowed to crawl this page or not.

How to Enable Custom Robots.txt in Blogger


1. Blogger Dashboard >> Select Blog >> Select Settings tab >> Search Preferences

Robots.txt

2. Click on Edit in front of Custom robots.txt
3. Click on Yes and proceed to next step.
3. Next a box comes up and paste following given code.

User-agent: Mediapartners-Google
Disallow:

User-agent: *
Disallow: /search
Allow: /
Sitemap: http://YOURBLOGURL.blogspot.com/feeds/posts/default?orderby=UPDATED
4. and finally click on Save Changes button to save code.

I hope this tip would help you. If you are having any issue regarding crawling then, feel free to leave your questions in the comments below and I would try to help you in solving them.

How to remove Blogger Navigation Bar?

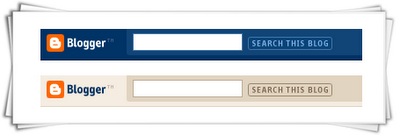
Blogger Navigation Bar

In every blog there is a blogger default navigation bar (nav bar) of the above style. This nav bar make your blog look less professional. These navigation bars can be removed using a simple CSS one line code.

Also read: Remove Subscribe to: Posts (Atom) Link on Blogger

Removing Blogger Deafult Nav Bar


Apply these steps to remove the Blogger Navigation bar / Blogger Nav Bar.
Steps:

  • Log-in to your blog
  • Template >> HTML >> Proceed
  • Search For this code  ]]></b:skin>   (tip: Use CTRL+F)
  • Now Just above/before  ]]></b:skin>   insert following code

#navbar-iframe,#navbar { display: none !important; }

Save your template and view your blog. Blogger Navigation Bar will no longer be there.

Add SEO Meta Tags (Title and Description) in Blogger

SEO Meta Tags:

SEO Meta Tags:


Meta tags is a important things for SEO (Search Engine Optimization). The <meta> tag provides metadata about the HTML document. Meta tags will not be displayed on the page, but will be machine parsable. Meta elements are typically used to specify page description, keywords, author of the document, last modified, and other metadata. The metadata can be used by browsers (how to display content or reload page), search engines (keywords), or other web services. Google bots read meta tags of a site or blog and give these tags (title,keywords and description) information to google search engine, according to these tags your blog is showed in google search engine results pages (SERP's).

Meta Tags are most important and most useful for our blog's SEO. Also see updated post on Meta Tags

Put SEO Meta Tags in Blogger Template

Learn how to put Meta Tags in blogger template for better ranking in search engine results with easy steps.


Step 1.
Login to Blogger >> Go to Dashboard >> Template >> Edit Html

Step 2.
Find the following code [Tip: Ctrl+F]
<head>
This will be mostly on the main page of the template coding.


Step 3.
After/under this line paste the following code.
           <!-- Meta Tags ~  blogtipsuk.com  -->
 <meta content='Your Blog Description' name='description'/>
 <meta content='Keyword1,Keyword2,Keyword3' name='keywords'/>
 <meta content='Author Name' name='Author'/>
 <meta content='Author Email Address' name='Email'/>
 <meta content='all' name='robots'/>
 <meta content='index, follow' name='robots'/>
 <meta content='Language Name' name='language'/>
 <meta content='Country Name' name='country'/>
 <meta content='blogger' name='generator'/>
               <!-- /Meta Tags ~   blogtipsuk.com  -->

Step 4.
Change red color bolded text according to your choice.

Note:  write keywords in separate commas  i.e., write comma after every word.

Step 5.
Now save your template and you are done, your blog is optimized for SEO and Google will show your site/blog in search results

SEO Meta Tags in Google Search Engine Results Pages


Your Blog's Title and Description Tag will look like this in Google Search.

Title and Description Meta Tags

Recent/Latest Posts Widget For Blogger/Blogspot

Recent Posts Widget
You surely have seen on many blogs and websites a Recent Posts Widget in the sidebar that shows the recent or newest or latest posts of the certain blog or website. This widget shows how to write posts title for SEO, date of post and an image of the post and even a snippet of the post. So today we are going to learn how to make this widget for your blog with some very easy steps. So let's start now.


How to add Recent Posts Widget to Blogger


Step 1. Log in to your Blogger Dashboard, then go to Layout and click on Add a Gadget link
Step 2. From the pop-up window, scroll down and choose HTML/JavaScript.
Step 3. Select & Copy the code from one of the options below and paste it into the new HTML/JavaScript: 

Option 1: Recent posts widget with snippets

<div id="hlrpsa">
<script src="http://helplogger.googlecode.com/svn/trunk/recent-posts-with-snippets.js">
</script>
<script>
var numposts = 5;var showpostdate = false;var showpostsummary = true;var numchars = 100;var standardstyling = true;
</script>
<script src="http://your-blog.blogspot.com/feeds/posts/default?orderby=published&amp;alt=json-in-script&amp;callback=showrecentposts">
</script></div>
<div id="rpdr" style="font-family: arial, sans-serif; font-size: 9px;">
<a href="http://www.blogtipsuk.com/2014/03/increase-traffic-visitors-to-blog-easily.html" target="_blank" title="Grab this Recent Posts Widget" alt="Increase blog Traffic tips">how to increase blog traffic in blogger</a> by <a href="http://www.blogtipsuk.com/" title="Recent Posts Widget"
alt="Blogger Tips and tricks">SEO Tips and Tricks</a></div><noscript>Your browser does not support JavaScript!</noscript>
<style type="text/css">
#hlrpsa a {color: #0B3861; font-size: 13px;} #rpdr {background: url(https://blogger.googleusercontent.com/img/b/R29vZ2xl/AVvXsEj0-1tVNqu1lB9droZgWAnXPpaGRggZZ0luRGlzqGaEgZpQxCwxWw4kXmf6rmtFTLX6ga7Rjo7qw92MtS-v4IVZUrDwkrY6F46mcqzI0w7eqX1vnfS2_KN9Zhyphenhyphen-ooA9XpgD3GOedCX3kwwk/s1600/blogger.png) 0px 0px no-repeat; padding: 1px 0px 0px 19px; height:14px; margin: 5px 0px 0px 0px;line-height:14px;}
#rpdr, #rpdr a {color:#808080;}
#hlrpsa { color: #999999; font-size: 11px; border-bottom:1px #cccccc dotted; margin-top:-10px; padding-bottom:10px;}
.hlrps a {font-weight:bold; }
.hlrpssumm {}
</style>


Option 2: Recent Posts Widget Showing Post Titles Only


<div id="hlrpsb">
<script style="text/javascript" src="http://helplogger.googlecode.com/svn/trunk/recent-posts-with-titles-only.js"></script>
<script style="text/javascript">var numposts = 10;var showpostdate = false;var showpostsummary = false;var numchars = 100;var standardstyling = true;</script>
<script src="http://your-blog.blogspot.com/feeds/posts/default?orderby=published&alt=json-in-script&callback=showrecentposts"></script></div>
<div id="rpdr" style="font-family: arial, sans-serif; font-size: 9px;">
<a href="http://www.blogtipsuk.com/2014/03/increase-traffic-visitors-to-blog-easily.html" target="_blank" title="Grab this Recent Posts Widget" alt="Increase blog Traffic tips">how to increase blog traffic in blogger</a> by <a href="http://www.blogtipsuk.com/" title="Recent Posts Widget"
alt="Blogger Tips and tricks">SEO Tips and Tricks</a></div><noscript>Oops! Make sure JavaScript is enabled in your browser.</noscript>
<style type=text/css>
#hlrpsb a {color: #0B3861; font-size: 13px;} #rpdr {background: url( https://blogger.googleusercontent.com/img/b/R29vZ2xl/AVvXsEj0-1tVNqu1lB9droZgWAnXPpaGRggZZ0luRGlzqGaEgZpQxCwxWw4kXmf6rmtFTLX6ga7Rjo7qw92MtS-v4IVZUrDwkrY6F46mcqzI0w7eqX1vnfS2_KN9Zhyphenhyphen-ooA9XpgD3GOedCX3kwwk/s1600/blogger.png ) 0px 0px no-repeat; padding: 1px 0px 0px 19px; height:14px; margin: 5px 0px 0px 0px;line-height:14px;}
#rpdr, #rpdr a {color:#808080;}
.bbrecpost2 {
padding-top:6px;
padding-bottom:6px;
border-bottom: 1px #cccccc dotted; }
</style>

Step 4.

  • Change 5 (option 1) and 10 (option 2) with the number of posts you want to display. 
  • Change false to true if you want the posts dates to appear 
  • Change 100 (option 1) if you want more characters to be displayed.
  • To change the color and font size of the links, modify the values in blue (links) and violet (font-size)
  • To change the style of posts summary, modify the values in green (color) and orange (font size)
  • Replace the your-blog text with the name of your blog or if you have a custom domain change all the bolded line with your address.

Step 5. Save your widget. And that's it! Enjoy!

If you need any help, leave a comment below.
And if you liked this post, please consider sharing it. Thanks.

Add Custom Error Page (Page Not Found) in Blogger

Custom Error Page (Page Not Found)

What is Error 404 Page ?

This page appears only

1. When a reader reaches to a page that does not exist or

2. Reader type wrong permalink for a post or page. This type of link is known as broken link or Custom Page Not Found or (Error 404 Page).


Also Read: How to Remove "Powered By Blogger" Attribution from Blogger

How to Add Custom Error Page (Page Not Found) to Blogger

Now you can create a Custom Error 404 Page (Page Not Found) for Blogger blog. This error page design i'm giving you is an idea only (which i use in my blogs). This error page gives the users message that page is not found or currently unavailable. It also has a link to Homepage of the blog and a Search box for users to search within your site. You can create a custom error page as per your blog design and creativity. 

Follow these steps to apply this error page on your blog or website.

1. Blogger Dashboard >> Select Blog >> Select Settings tab >> Search Preferences
2. Now under Error and redirections you can find Custom Page Not Found. Next to this there is an Edit option. Now click on this.
3. Next a box comes up and paste following given code

<h3>Your requested page was not found</h3>
<p>Sorry, we cannot find the page that you are looking for. It might have been removed, had its name changed, or is temporarily unavailable.<br/>
Please check that the Web site address is spelled correctly.</p>
<b>Other things to try:</b><br/>
<ul>
<li>Go to our <a href="/">home page</a>, and use the menus or links to navigate to a specific post.</li>
<li>
<form method="get" action="/search">
<table width="100%">
<tr>
<td><input type="text" style="width:95%;padding:2px;" value="Search this blog.." onfocus="if (this.value == &quot;Search this blog..&quot;) {this.value = &quot;&quot;}" onblur="if (this.value == &quot;&quot;) {this.value = &quot;Search this blog...&quot;;}" name="q"></td>
<td><input type="button" Value="Search"></td>
</tr>
</table>
</form>
</li>
</ul><br /><a href="http://bloggerseotipstraining.blogspot.com/2013/04/add-custom-error-page-not-found-in-blogger.html">Error Page from Blogger and SEO Tips</a>
 4. and finally click on Save Changes button to save code.

Now visit any page which is not a part of your blog e.g., ( www.yourhomepage.com/ssssss ) and see this beautiful error page working having a link to homepage and a search box.
If you have any question regarding this than comment down and ask, I'll try to answer your questions. Thanks.